
Your motorcycle battery is the heart of your electrical system. Without proper maintenance, you’ll find yourself stranded with a bike that won’t start—and possibly thousands in electrical damage. This guide covers everything DIY enthusiasts need to know about motorcycle battery maintenance, from basic testing to complete replacement.
Whether you’re a casual rider or a weekend warrior, understanding your battery will save you money and headaches. Let’s dive in.
Types of Motorcycle Batteries: Understanding Your Options
Before you can properly maintain your motorcycle battery, you need to understand what you’re working with. There are three main types of motorcycle batteries in use today.
Lead-Acid Batteries (Flooded)
Lead-acid batteries are the traditional choice and remain popular on many motorcycles. They’re affordable and reliable, but they require regular maintenance.
Pros:
- Lowest cost (typically $30-80)
- Widely available
- Good cold-start performance
- Repairable if damaged
Cons:
- Requires regular electrolyte checks
- Hydrogen gas emission when charging
- Slower to accept charge
- Shorter lifespan (2-3 years)
These batteries have removable caps on top, allowing you to check and top up the electrolyte level. If you own an older motorcycle or a budget-conscious rebuild, you’ll likely have a flooded lead-acid battery.
AGM Batteries (Absorbed Glass Mat)
AGM batteries are sealed batteries filled with a special glass mat material that absorbs the electrolyte. They’re the middle ground between flooded and lithium options.
Pros:
- No maintenance required
- Better vibration resistance
- Faster charging
- Longer lifespan (3-5 years)
- Superior cold-start performance
Cons:
- More expensive ($60-150)
- Cannot be opened or refilled
- Sensitive to overcharging
Most modern motorcycles come equipped with AGM batteries. They’re sealed units, so you don’t need to check electrolyte levels—just maintain proper charge.
Lithium-Ion Batteries
Lithium batteries are the newest option, increasingly popular with serious riders and sportbike enthusiasts.
Pros:
- Extremely lightweight (up to 70% lighter than lead-acid)
- Excellent starting power even when partially discharged
- Very long lifespan (5+ years)
- No maintenance required
- Fast charging capability
Cons:
- Expensive ($150-400+)
- Requires special charger
- Temperature-sensitive
- Overkill for casual riders
Lithium batteries make sense if you’re upgrading a sportbike or want maximum reliability, but they’re not necessary for most DIY mechanics.
Identify Your Battery Type: Check your owner’s manual or look for removable caps on top. No caps = AGM or lithium. Removable caps = lead-acid flooded battery.
How to Test Your Motorcycle Battery
Before you replace your battery, test it. Many failing batteries can be recovered with a proper charge cycle. Here’s how to test your battery safely and accurately.
What You’ll Need
- Digital multimeter ($15-30)
- Motorcycle battery charger (12V)
- Safety glasses
- Work gloves
- Clean cloth
Step 1: Visual Inspection
Start with a visual check before using any electrical tools.
What to look for:
- Cracked or damaged case (replace immediately)
- Corrosion on terminals (white, blue, or green crusty deposits)
- Leaking electrolyte (smell like rotten eggs or see fluid)
- Loose or corroded cables
Clean any corrosion with a mixture of baking soda and water. Use a wire brush for stubborn deposits on terminals. If there’s damage to the case or leaking electrolyte, the battery is dead and needs replacement.
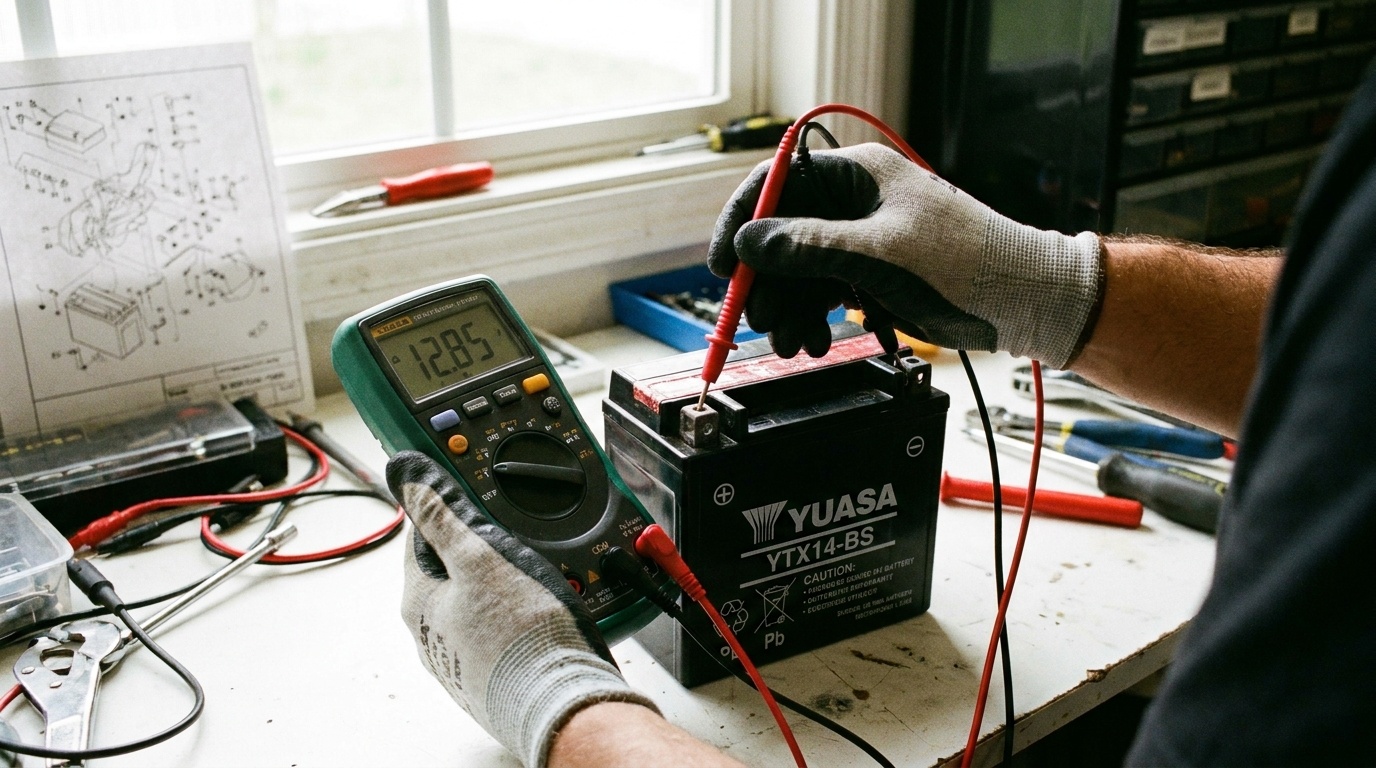
Step 2: Resting Voltage Test
Your battery’s resting voltage tells you its charge level. This test is done when the battery has been sitting for at least 2 hours without charging or use.
How to test:
- Set your multimeter to DC voltage (V with a line and dots)
- Place the red probe on the positive (+) terminal
- Place the black probe on the negative (-) terminal
- Read the voltage
What the numbers mean:
- 12.6V or higher: Battery is fully charged
- 12.0V to 12.5V: Battery is partially discharged (charge it)
- 11.5V to 12.0V: Battery is mostly discharged (needs charging)
- Below 11.5V: Battery is dead or defective (likely replacement needed)
Step 3: Charging System Test
A failing charging system will drain even a good battery. Test your charging system while the motorcycle is running.
How to test:
- Start your motorcycle and let it idle
- Set multimeter to DC voltage
- Measure voltage across the battery terminals while running
What the numbers mean:
- 13.5V to 14.5V: Charging system working normally
- 12.0V to 13.4V: Charging system failing or weak (see a mechanic)
- Below 12.0V: Charging system not working (electrical failure)
If the charging system isn’t putting out voltage, your battery will drain regardless of condition.
Step 4: Load Test (Advanced)
A load test applies electrical stress to the battery to see if it can hold voltage under demand.
Without specialized equipment:
- Charge the battery fully to 12.6V
- Turn on the headlight (high beam)
- Watch the multimeter reading over 2-3 minutes
- Battery should hold 11.8V or higher
If voltage drops rapidly below 11.8V, the battery’s internal cells are failing—replace it.
Motorcycle Battery Replacement: Step-by-Step
If testing confirms your battery is dead, replacement is straightforward. Most riders can do this in 15-30 minutes.
Tools You’ll Need
- Socket wrench set
- Battery terminal puller (or flat screwdriver)
- Baking soda and cloth (for corrosion cleanup)
- Work gloves and safety glasses
- New battery (correct size and type for your bike)
Safety First
Before touching anything:
- Turn off the motorcycle and remove the key
- Wait 10 minutes for capacitors to discharge
- Remove any metal jewelry (rings, watches, bracelets)
- Never smoke or create sparks near batteries
Replacement Process
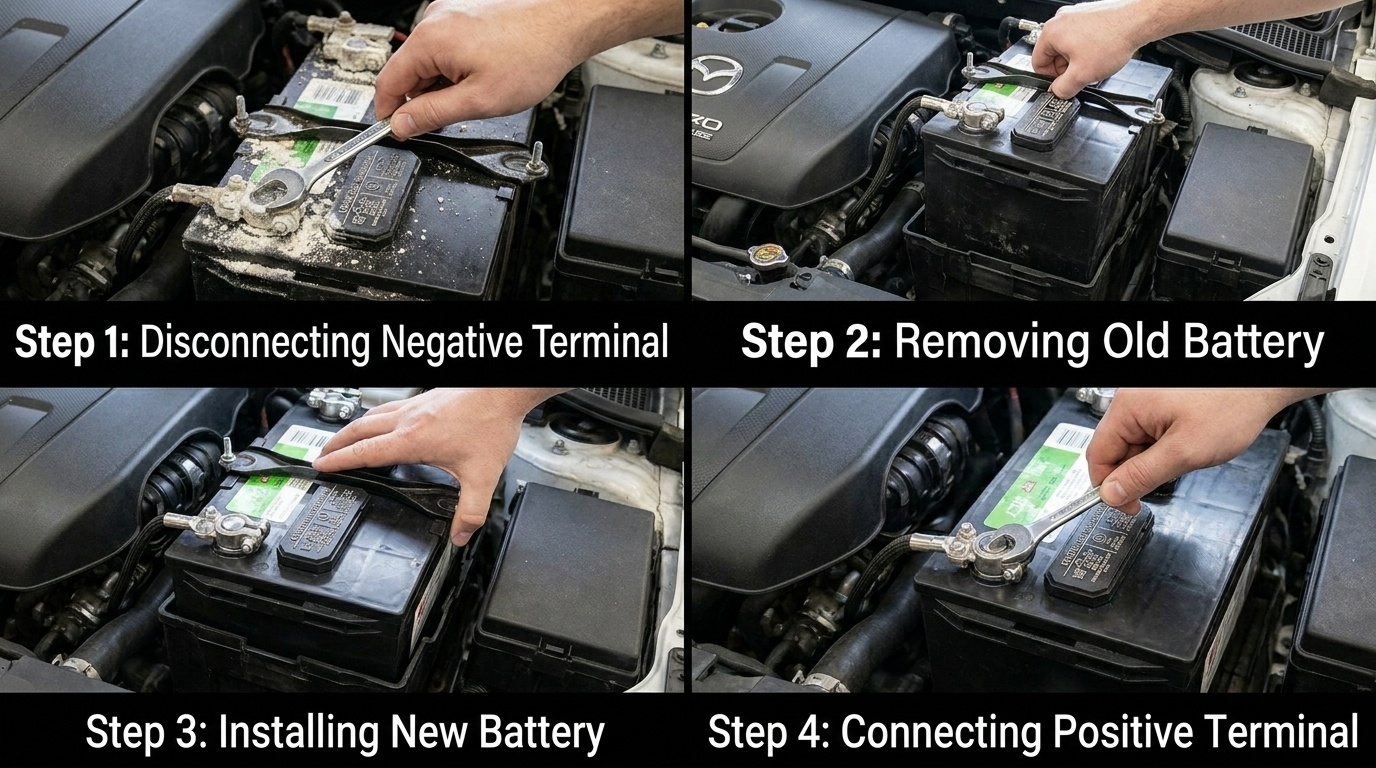
Step 1: Locate the Battery Most motorcycles have the battery under the seat or side cover. Check your owner’s manual for the exact location. Remove any covers or panels necessary to access the battery.
Step 2: Disconnect the Negative Terminal First Always disconnect negative first. Use your wrench to loosen the nut on the negative (-) terminal.
Why negative first? If you touch your wrench to the positive terminal while it’s still connected to negative, you’ll create a short circuit and spark. Disconnecting negative prevents this.
Gently wiggle and lift the negative cable away from the terminal.
Step 3: Disconnect the Positive Terminal Now loosen and remove the positive (+) terminal using the same method. Set it aside safely away from the battery.
Step 4: Remove the Battery Hold-Down Most batteries are secured with a strap or clamp to prevent movement. Locate and remove the fasteners. Gently lift the old battery out of the tray.
Important: Lead-acid batteries are heavy (15-25 lbs). Lift with your legs, not your back.
Step 5: Clean the Battery Tray and Terminals Before installing the new battery, clean the metal terminals and tray. Use baking soda mixed with water to remove any corrosion or electrolyte residue. Dry completely with a cloth.
Step 6: Install the New Battery
- Check that your new battery is the same voltage (12V) and approximate size
- Place the battery in the tray in the same orientation as the old one (positive terminal on correct side)
- Secure with the hold-down strap, tightening snugly but not excessively
- Connect the positive (+) terminal first, tightening the nut firmly
- Connect the negative (-) terminal last, tightening the nut firmly
Why positive first now? The battery is no longer in the bike’s circuit, so it’s safe to connect positive first. We connected negative first when disconnecting to prevent sparks in the live circuit.
Step 7: Verify the Connection Gently wiggle each terminal connection. They should be tight with no movement. Loose connections will cause starting issues.
Step 8: Reinstall Covers and Test
- Reinstall any side covers, seat, or fairings
- Insert the key and turn to the ON position (don’t start)
- Check that lights, gauges, and electronics power up normally
- Start the motorcycle and verify it starts smoothly
- Listen for the charging system (should hum slightly when revving)
Done! Your new battery should be ready for 3-5 years of service (depending on type).
Troubleshooting Common Battery Problems
Problem: Battery Won’t Hold a Charge
Symptoms: Battery drains overnight even when parked.
Causes:
- Faulty charging system (most common)
- Defective alternator or regulator
- Parasitic drain (electronics drawing power while off)
- Old, worn-out battery nearing end of life
Solution:
- Perform the charging system test (see Testing section above)
- If voltage drops while running, your charging system needs repair
- Check for aftermarket electronics left on (GPS, dash cam, heated grips)
- Have a mechanic test the alternator if charging voltage is low
Problem: Slow or Weak Starting
Symptoms: Engine cranks slowly, sometimes doesn’t start, but clicks when you turn the key.
Causes:
- Weak battery (low charge)
- Corroded terminals preventing current flow
- Failing starter motor
- Cold weather (batteries have 50% less power below freezing)
Solution:
- Charge the battery fully and retest
- Clean terminals and connections with baking soda solution
- Test the charging system while running
- If voltage is normal but starting is still weak, have starter tested
Problem: Battery Leaking
Symptoms: White, blue, or green crusty deposits around terminals or battery case.
Causes:
- Overcharging (charging system failure)
- Age and normal wear
- Cracked case from impact damage
Solution:
- If it’s just terminal corrosion: clean with baking soda and water
- If case is leaking: replace battery immediately (safety hazard)
Problem: Battery Sulfation (Lead-Acid Only)
Symptoms: Battery won’t hold charge even after full recharge, charge time is very short.
Causes: Lead-acid batteries left discharged for extended periods develop sulfate crystals on plates that prevent charging.
Solution:
- Attempt a slow, deep charge (12-24 hours at 2 amps)
- Use a battery desulfator product (may help but often doesn’t)
- Replace the battery if it’s more than 2 years old
Motorcycle Battery Winterization
Cold weather is hard on motorcycle batteries. A battery that works fine in summer can fail in winter if not properly maintained.
Why Batteries Die in Cold Weather
Cold temperatures:
- Reduce chemical reaction speed (slower charging and discharge)
- Thicken oil and increase engine drag (starter works harder)
- Reduce available power by 40-50% at 32°F compared to 70°F
Winter Battery Care
Monthly During Cold Season:
- Check resting voltage (should be 12.6V)
- Clean any corrosion from terminals
- Test charging system while running
Before Long Storage (4+ weeks):
- Charge battery to full 12.6V
- For lead-acid batteries: check electrolyte level and top with distilled water if low
- Disconnect the negative terminal (prevents parasitic drain)
- Consider a battery maintainer ($30-50) that trickle-charges while parked
Battery Maintainers Explained: A battery maintainer is different from a charger. Chargers actively charge the battery; maintainers apply a small trickle charge to keep the battery at 100% without overcharging. For winter storage longer than 2 weeks, a maintainer is money well spent.
Recommended Procedure for 3-Month+ Storage:
- Run motorcycle and charge battery to full capacity
- Disconnect negative cable at battery
- Connect a battery maintainer to positive and negative terminals
- Leave maintainer connected throughout storage
- Battery will start your bike immediately in spring
This simple step prevents 90% of “won’t start after winter storage” problems.
FAQ: Motorcycle Battery Maintenance
How often should I check my battery?
Check your battery resting voltage monthly, especially in cold weather or if you ride infrequently. AGM and lithium batteries need less frequent checks (quarterly is fine), but lead-acid flooded batteries should be checked monthly to verify electrolyte level.
Can I use a car battery charger on my motorcycle?
Car chargers can damage motorcycle batteries due to higher charging current (10+ amps vs. 2-5 amps needed for motorcycle batteries). Always use a charger rated for 12V motorcycles. Look for chargers that offer a “trickle charge” or low-amp mode (2-5 amps).
How much does a motorcycle battery replacement cost?
- Lead-acid (flooded): $30-80
- AGM: $60-150
- Lithium-ion: $150-400+
Installation is free if you do it yourself (15-30 minutes), or $50-100 at a shop.
Why is my new battery already low on charge?
New batteries often arrive with a partial charge (50-75%) for safety during shipping. Before first use, fully charge the battery. This “formats” the battery and establishes proper chemical balance.
What’s the difference between a motorcycle battery and a car battery?
Motorcycle and car batteries both produce 12 volts, but motorcycle batteries:
- Provide higher starting current for smaller engines
- Are physically smaller and lighter
- Discharge faster (motorcycle electronics are less efficient)
- Handle vibration differently (motorcycle mounting is more aggressive)
Using a car battery on a motorcycle isn’t recommended—it may not fit physically and won’t discharge at the right rate for motorcycle charging systems.
Is a lithium battery worth the cost?
For most riders: no. Lead-acid or AGM batteries are reliable and affordable. Lithium makes sense if you:
- Own a sportbike and want maximum starting power
- Live where temperatures regularly drop below -10°F
- Race your motorcycle and need reliability
- Want to reduce weight for performance
For casual weekend riding, AGM is the best value.
Can I jump-start a motorcycle with a car?
Yes, but carefully. Use jumper cables to connect the car’s positive to the motorcycle positive, and car’s negative to a bare metal ground on the motorcycle frame (not the negative terminal directly—this reduces spark risk).
Car alternators output higher voltage (14.5V+) than motorcycle systems. Jump-start quickly and avoid revving the car engine above 2,000 RPM while connected.
Maintenance Schedule: Keep Your Battery Healthy
Here’s a simple calendar to keep your motorcycle battery in top condition:
Monthly:
- Check resting voltage with multimeter
- Visually inspect for corrosion
- Test battery during riding (listen for normal charging hum)
Every 3 Months:
- Clean any terminal corrosion with baking soda solution
- If lead-acid: check electrolyte level
- Test charging system voltage while riding
Every 6 Months:
- Full load test (see testing section)
- Check all cables and connections for damage
- Replace corroded terminals if necessary
Seasonally (Before Winter):
- Full charge battery
- Set up battery maintainer if storing 4+ weeks
- Disconnect battery if parked for 6+ weeks
Annually:
- Replace battery if more than 3 years old (preventive maintenance saves stranding)
- Professional alternator/charging system inspection if having issues
Following this schedule adds 1-2 years to battery life and prevents most starting issues.
When to Replace Your Battery
Replace your motorcycle battery if any of these apply:
- Age: More than 3-5 years old (depending on type)
- Won’t hold charge: Can’t reach 12.6V after 8 hours charging
- Voltage drops rapidly: Falls below 11V after starting and running
- Physical damage: Cracked case, leaking electrolyte
- Corrosion: Terminals corroded white/blue despite cleaning
- Failed cold-start test: Won’t reliably start when cold
A worn battery that occasionally fails is worse than a new one. The cost of a new battery ($60-150) is cheap insurance against being stranded.

Conclusion
A well-maintained motorcycle battery is the foundation of a reliable electrical system. By understanding your battery type, testing regularly, and following seasonal maintenance, you’ll avoid the frustration of a dead battery when you need to ride.
Start with a visual inspection this week. Check your resting voltage with a multimeter and clean any corrosion you find. These simple steps take 10 minutes and can add years to your battery’s life.
Save this guide to your bookmarks. Return to it each season and follow the maintenance schedule. Your motorcycle will reward you with reliable starts and trouble-free riding.
Ready to master other electrical systems?
Learn how your entire electrical system works or check out our complete motorcycle maintenance checklist