
A well-maintained chain is essential to your motorcycle’s performance, longevity, and safety. Motorcycle chain maintenance isn’t complicated, but it’s often overlooked—leaving riders with premature wear, poor acceleration, and dangerous riding conditions. This comprehensive motorcycle chain maintenance guide covers everything you need to know about cleaning, lubricating, inspecting, and maintaining your chain.
Whether your motorcycle uses a standard O-ring, X-ring, or sealed chain, the fundamental motorcycle chain maintenance process remains the same. By the end of this guide, you’ll understand the best cleaning methods, which lubricants work best, how to adjust tension properly, and when to replace your chain entirely.
Why Motorcycle Chain Maintenance Matters
Your motorcycle chain is one of the hardest-working components on your bike. It transfers engine power directly to the rear wheel, handling tremendous force with every acceleration. Over time, dirt, grime, salt, and moisture accumulate on the chain, breaking down its O-rings and seals. Without proper motorcycle chain maintenance, a chain can fail completely—and a chain failure at speed is a serious safety hazard.
According to [EXTERNAL LINK: Motorcycle Industry Council maintenance guidelines], regular motorcycle chain maintenance extends chain life from 20,000 miles to 40,000+ miles, saves money on premature replacement, and improves overall ride quality.
The cost of neglect:
- Worn chain causes poor acceleration and fuel economy
- Neglected chains wear out sprockets faster (adding $200+ to replacement costs)
- Chain slip or failure at highway speed can cause accidents
- Proper motorcycle chain maintenance costs less than $20/year in supplies
The benefit of consistent care:
- Motorcycle chain maintenance takes 15–30 minutes per month
- Extends chain and sprocket lifespan by 50–100%
- Improves acceleration feel and responsiveness
- Reduces riding noise and vibration
Understanding Your Motorcycle Chain
Before performing motorcycle chain maintenance, understand what you’re working with. Different chain types require slightly different care approaches, though the fundamentals of motorcycle chain maintenance remain consistent.
O-ring chains (most common): Feature rubber O-rings that seal the side plates and rollers. O-ring chains are standard on most modern motorcycles and are the most durable. Motorcycle chain maintenance for O-ring chains focuses on cleaning away grime without damaging the seals.
X-ring chains (high-performance): Use X-shaped seals instead of O-rings for less friction and better performance. X-ring chains are common on sport bikes. Motorcycle chain maintenance procedures are identical to O-ring chains.
Non-sealed chains (older bikes): Lack seals and require more frequent motorcycle chain maintenance due to increased rust and wear. These chains demand weekly cleaning and lubrication during riding season.
Sealed vs. non-sealed: Modern motorcycle chain maintenance focuses on sealed chains, which are more durable and forgiving. If your motorcycle has an old non-sealed chain, you’ll need to clean and lubricate every 100–200 miles.
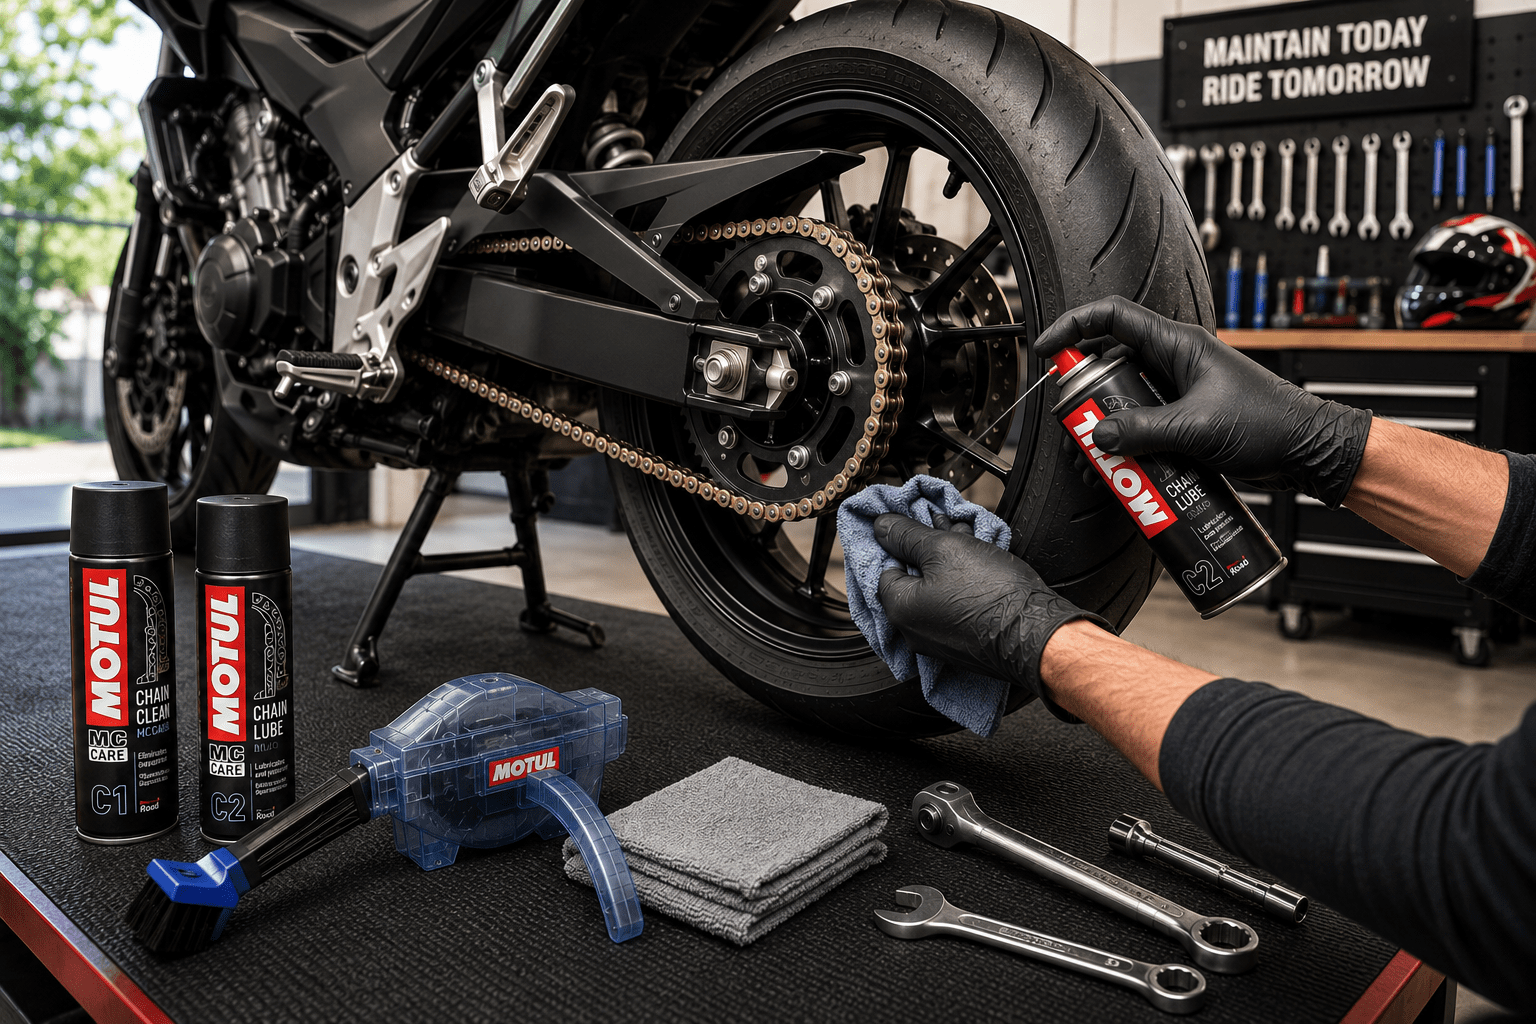
Essential Tools and Materials for Motorcycle Chain Maintenance
Before starting your motorcycle chain maintenance routine, gather the right tools. You don’t need expensive equipment—basic tools work fine.
Essential for motorcycle chain maintenance:
- Chain cleaning brush or soft-bristle brush
- Motorcycle chain cleaner or degreaser
- Motorcycle chain lubricant (O-ring safe)
- Clean rags or shop towels
- Motorcycle center stand or rear paddock stand
- Safety glasses and gloves
Helpful but optional for motorcycle chain maintenance:
- Chain measurement tool (to check wear)
- Torque wrench (for axle and sprocket bolts)
- Motorcycle lift (for easier chain access)
What NOT to use for motorcycle chain maintenance:
- Pressure washer (high pressure damages O-ring seals)
- Gasoline or acetone (solvents that damage seals)
- Automotive chain lube (not O-ring safe)
- Lacquer thinner (dissolves rubber seals)
According to [EXTERNAL LINK: Yamaha’s official motorcycle chain maintenance manual], using O-ring-safe products is critical to proper motorcycle chain maintenance. Non-approved cleaners void warranties and damage seals.
Step 1: Inspect Your Chain Before Motorcycle Chain Maintenance
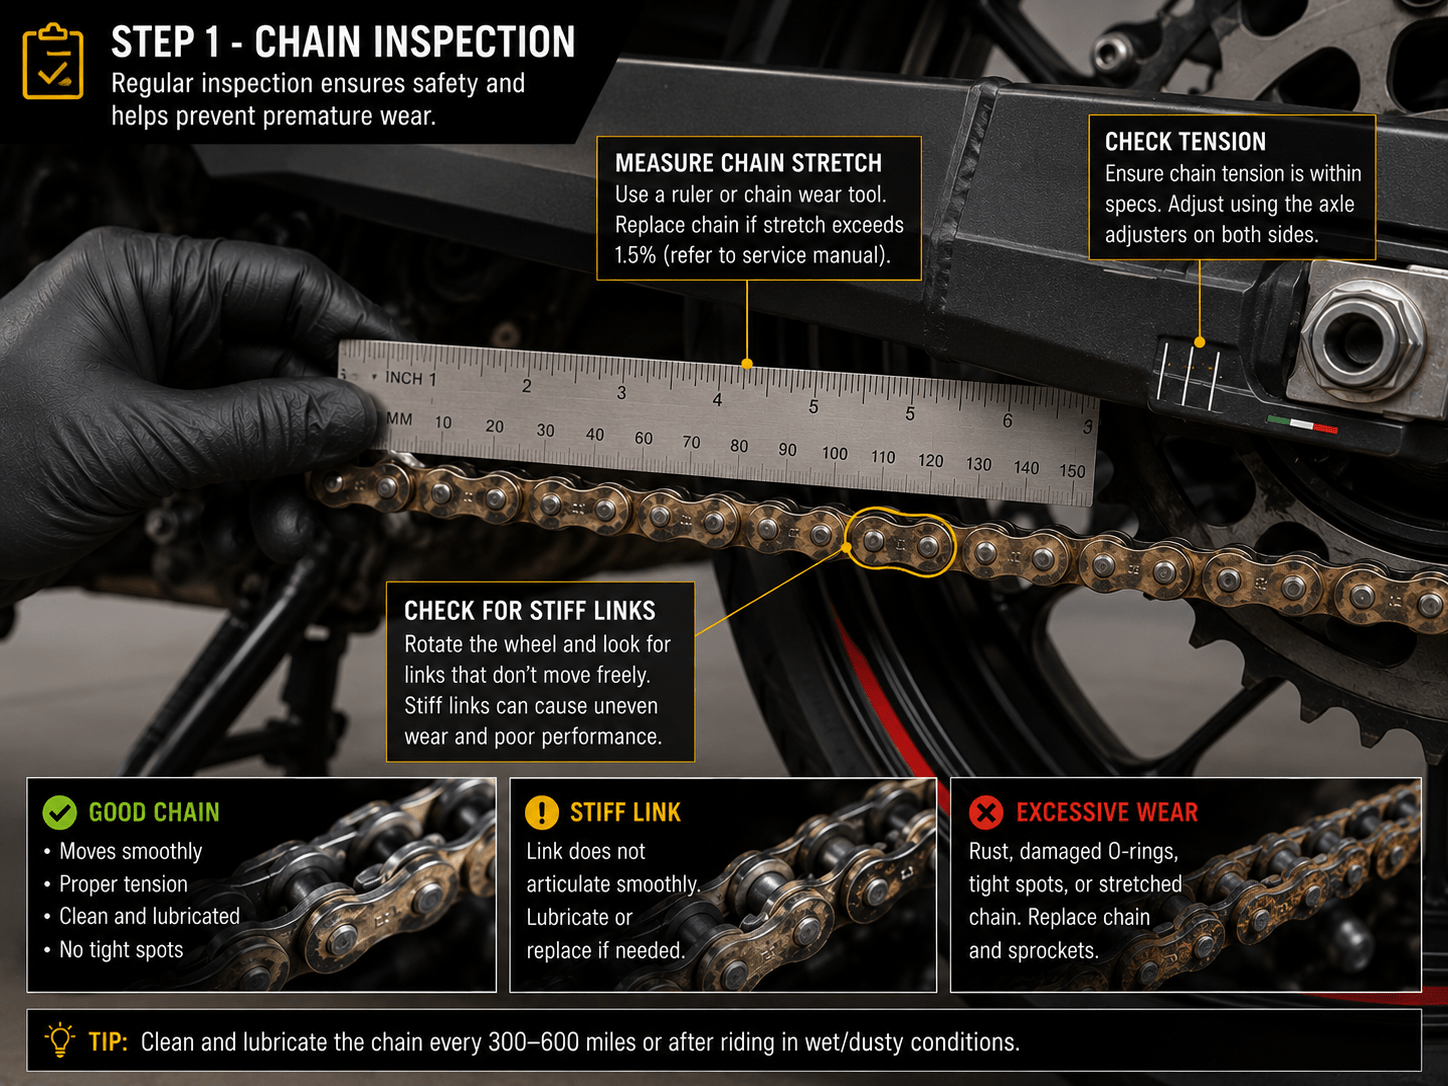
Every motorcycle chain maintenance session should start with inspection. Understanding your chain’s condition guides your maintenance approach.
Inspection steps for motorcycle chain maintenance:
- Check chain tension. Spin the rear wheel freely and find the tightest point in the chain. At the tightest spot, you should have 1–1.5 inches of vertical play (movement). If the chain is too tight, it strains the bearings; too loose, and it can slip or derail.
- Measure chain stretch. Use a ruler to measure 16 pins on the chain (15 spaces). A new chain measures exactly 20 inches. If your motorcycle’s chain measures more than 20.3 inches, it’s stretched and needs replacement soon—worn chain won’t stay engaged with new sprockets.
- Look for rust or corrosion. Rust indicates broken seals or inadequate motorcycle chain maintenance. Light surface rust can be cleaned; heavy rust (orange or flaking) signals chain replacement is overdue.
- Check for stiff links. Spin the chain and watch for sections that don’t move smoothly. A stiff link indicates a bent pin or damaged O-ring seal—that link may fail under load.
- Inspect sprockets. Look at the front and rear sprockets. Teeth should have a sharp “shark fin” shape. Hooked or rounded teeth indicate worn sprockets that need replacement during your motorcycle chain maintenance cycle.
Red flags requiring immediate chain replacement:
- Rust that won’t clean off
- More than 2–3 stiff links
- Severely hooked sprocket teeth
- Chain stretch exceeding 0.6 inches per 15 links
Step 2: Position Your Motorcycle for Chain Maintenance
Proper positioning makes motorcycle chain maintenance safer and more effective. Never work under a motorcycle unless it’s secured properly.
Setup for motorcycle chain maintenance:
- Use a secure stand. Deploy the center stand if your motorcycle has one. For additional security during extended motorcycle chain maintenance work, use a rear paddock stand under the swingarm.
- Ensure the rear wheel spins freely. Push the motorcycle backward slightly to confirm the wheel rotates without resistance. If using a rear stand, the wheel should spin easily—if it doesn’t, the stand position may need adjustment.
- Position yourself safely. Stand beside the motorcycle where you can see the entire chain. Avoid positioning your hands or body where they could be caught if the wheel starts spinning.
- Mark a reference point. Use a piece of tape or marker to mark one section of the chain. This helps you track chain rotation and ensures you clean the entire chain during motorcycle chain maintenance.
Step 3: Clean Your Motorcycle Chain Properly
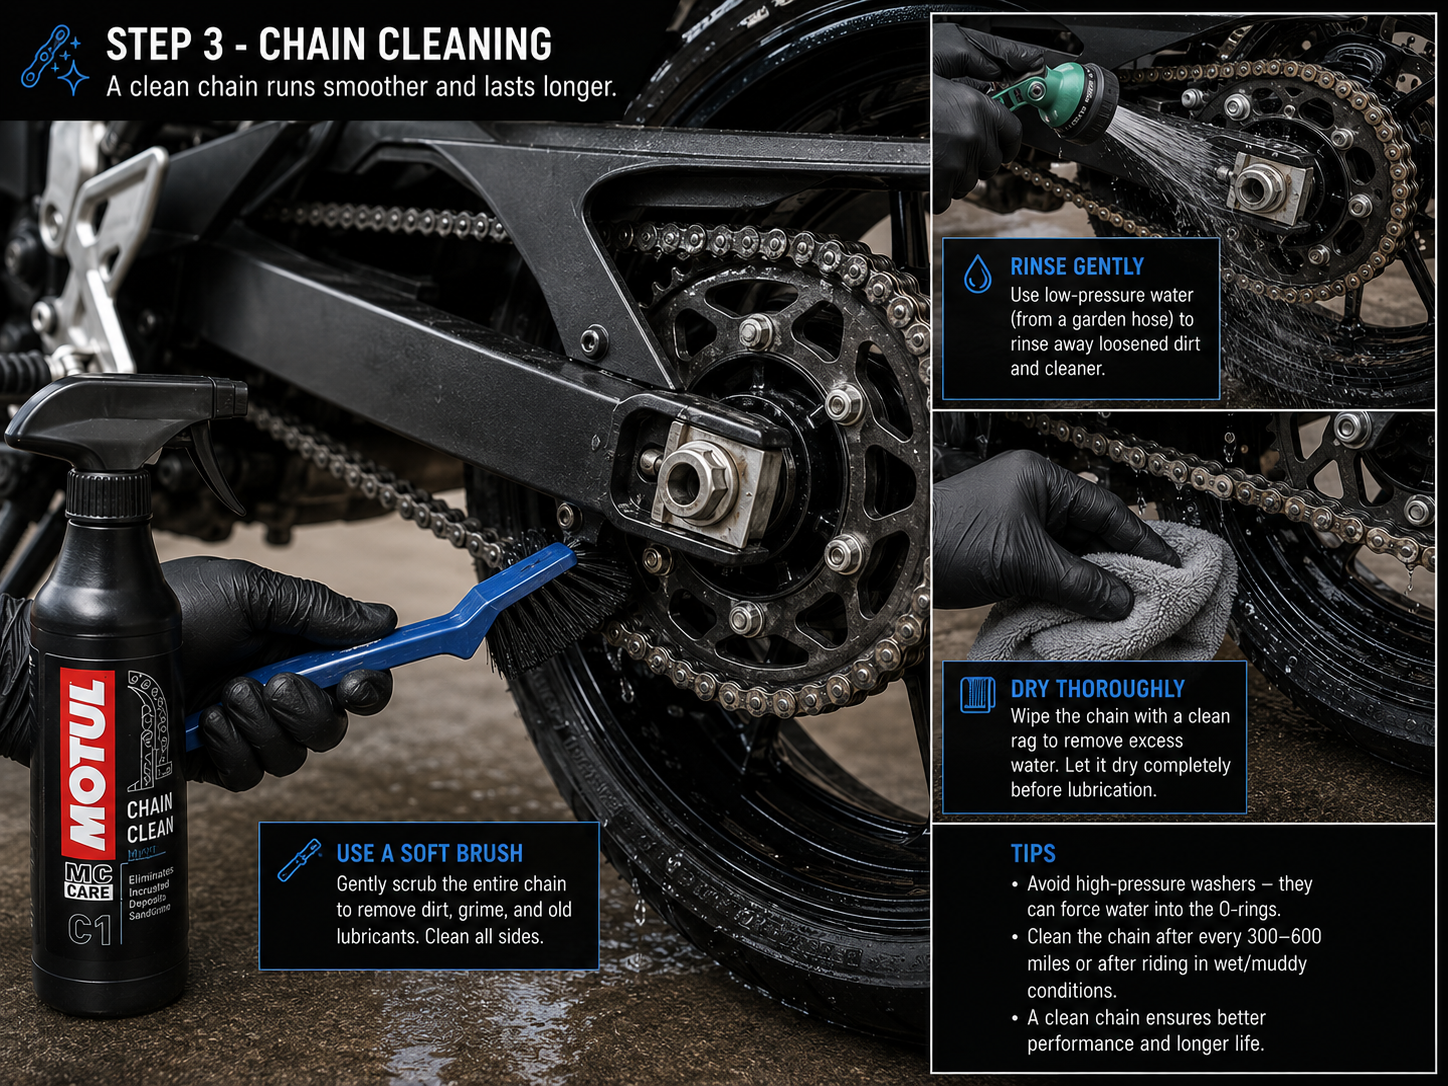
Motorcycle chain maintenance cleaning removes accumulated grime that breaks down O-ring seals. Use gentle methods—aggressive cleaning damages the chain.
Proper motorcycle chain cleaning process:
- Apply chain cleaner. Spray a motorcycle chain cleaner or degreaser on a 12-inch section of the chain. Allow it to soak for 30–60 seconds to break down grime. Avoid spraying the O-rings excessively—focus on the rollers, pins, and outer surfaces.
- Brush gently. Use a soft-bristle brush to scrub away dirt. Work in the direction of the chain rotation (top to bottom). Avoid aggressive scrubbing that could damage O-rings. A soft brush is better than a stiff wire brush for proper motorcycle chain maintenance.
- Rinse carefully. Spray with clean water at low pressure (garden hose, not pressure washer). Let water drain away without pooling on the O-rings. Pressure washers are NOT recommended for motorcycle chain maintenance—they force water past the seals.
- Move to the next section. Rotate the wheel by hand (slowly, safely) to bring a new section of chain into view. Clean the next 12-inch segment until the entire chain is clean.
- Final rinse and dry. After completing motorcycle chain maintenance cleaning, do a final gentle rinse and wipe the chain dry with a clean rag. Pat (don’t wipe vigorously) to avoid forcing water into the seals.
Motorcycle chain maintenance frequency:
- On-road riding: Clean every 300–500 miles
- Off-road or wet conditions: Clean every 100–200 miles
- Dry, clean conditions: Clean every 500 miles
Step 4: Lubricate Your Motorcycle Chain Correctly
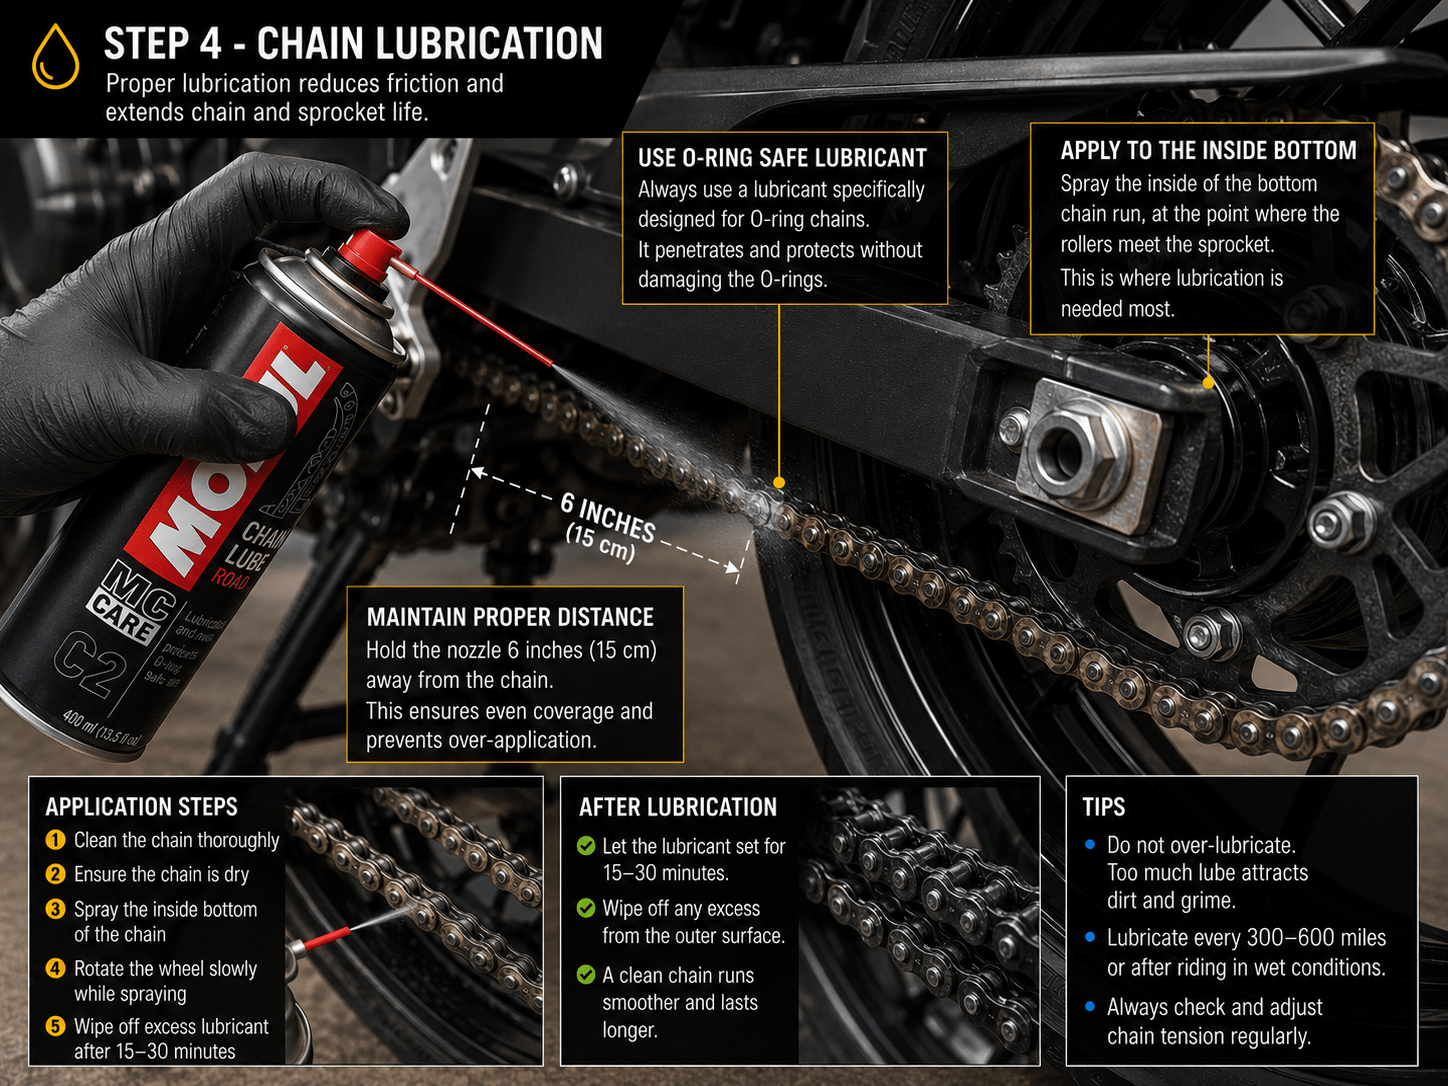
Proper lubrication is the heart of motorcycle chain maintenance. The right lubricant reduces friction, prevents rust, and protects O-rings.
How to apply motorcycle chain lubrication:
- Choose O-ring-safe lubricant. Always use chain lubricant marked “O-ring safe.” This is non-negotiable for proper motorcycle chain maintenance. Examples include Motul, Yamalube, and Castrol O-ring specific products. Automotive chain lube will damage O-rings.
- Apply along the bottom roller line. Hold the aerosol can 6 inches from the chain. Spray the inside bottom of the chain (the side against the swingarm)—this is where the lubricant flows into the O-ring seals naturally. Avoid spraying the top or outside excessively, as lubricant will sling off.
- Use moderate spray. A light coating is enough for proper motorcycle chain maintenance. The chain should glisten, not drip. Over-lubrication attracts dirt and grime, defeating the purpose of your motorcycle chain maintenance efforts.
- Rotate the wheel slowly. After spraying each section, rotate the wheel by hand to bring a new 12-inch section into view. This ensures the entire chain receives lubrication during your motorcycle chain maintenance session.
- Let lubricant penetrate. Wait 2–5 minutes after completing motorcycle chain maintenance lubrication before riding. This allows the lubricant to soak into the O-rings and seals.
Motorcycle chain maintenance lubrication schedule:
- Light riding (urban): Every 300–400 miles
- Aggressive riding: Every 200–300 miles
- Highway touring: Every 400–500 miles
- After riding in rain: Lubricate immediately
Types of motorcycle chain lubrication for maintenance:
- Aerosol spray (most common): Convenient, precise application. Recommended for monthly motorcycle chain maintenance.
- Brush-on liquid: Better control, less overspray. Good for detailed motorcycle chain maintenance work.
- Wax-based lubricants: Cleaner, less dirt attraction. Excellent for long-term motorcycle chain maintenance between washes.
According to [EXTERNAL LINK: Motul’s motorcycle lubrication technical guide], proper motorcycle chain maintenance requires specific O-ring-compatible formulations to maintain seal integrity.
Step 5: Adjust Chain Tension During Maintenance
Chain tension affects safety, performance, and component lifespan. Proper tension is essential to correct motorcycle chain maintenance.
How to adjust motorcycle chain tension:
- Locate the tension marks. Look at the swingarm—both sides have alignment marks or numbers (like “0,” “1,” “2”). These guide chain tension adjustment during motorcycle chain maintenance.
- Loosen the rear axle bolt. Using a socket wrench, loosen (but don’t remove) the rear axle bolt. Only loosen it enough to allow the wheel to move—you’re not removing it.
- Loosen the sprocket bolts. Most motorcycles have 4–6 bolts securing the rear sprocket. Loosen these slightly so the sprocket can shift when you adjust motorcycle chain maintenance tension.
- Adjust tension adjusters. Turn the tension adjuster bolts (one on each side of the swingarm, directly above the axle) equally. Turn clockwise to tighten the chain, counterclockwise to loosen it. Small turns (1/4 turn increments) are best for precise motorcycle chain maintenance adjustments.
- Check tension at multiple points. Spin the wheel slowly and check chain tension at several points (every 90 degrees). The chain should be equally tight at all points. If tension varies, the wheel may be misaligned—address this during motorcycle chain maintenance.
- Verify alignment. Align the tension marks on the swingarm. Both sides should show the same mark (e.g., both at “2”). Unequal tension indicates misalignment that affects handling and accelerates tire/chain wear.
- Torque the axle bolt. Once tension is correct, tighten the rear axle bolt to 60–80 Nm (check your manual). Proper torque is critical—too loose and the wheel can shift; too tight and you strain bearings.
Common motorcycle chain maintenance tension mistakes:
- Too tight: Strains bearings, accelerates wear, harsh ride
- Too loose: Chain can slip or derail, dangerous at speed
- Unequal tension: Causes misalignment, tire wear, handling issues
Step 6: When to Replace Your Motorcycle Chain
Even with perfect motorcycle chain maintenance, chains don’t last forever. Knowing when to replace is crucial.
Signs your chain needs replacement despite maintenance efforts:
- Excessive stretch: More than 0.6 inches per 15 links (measured from pin center to pin center over 15 chain links)
- Rust: Orange, flaking rust that won’t clean off indicates seal failure
- Broken links: Bent pins, cracked side plates, or visibly damaged rollers
- Worn sprockets: Hooked teeth or missing chunks on front or rear sprockets signal it’s time for new motorcycle chain maintenance components
- Age: Chains older than 5–7 years should be replaced even if they look fine
Motorcycle chain maintenance replacement interval:
- With excellent maintenance: 40,000–50,000 miles
- With average maintenance: 20,000–30,000 miles
- With poor maintenance: 10,000–15,000 miles
- Off-road or harsh conditions: 5,000–10,000 miles
According to [EXTERNAL LINK: Dunlop’s motorcycle component wear guide], chains are the most frequently replaced component after tires and brake pads. Regular motorcycle chain maintenance extends replacement intervals and saves money long-term.
FAQ
How often should I perform motorcycle chain maintenance?
For optimal results, perform basic motorcycle chain maintenance (inspection and lubrication) every 300–500 miles of riding. Deep cleaning with proper motorcycle chain maintenance techniques should happen every 1,000–1,500 miles. If you ride in wet or dusty conditions, increase frequency to every 200–300 miles for motorcycle chain maintenance checks.
Can I use car engine oil for motorcycle chain maintenance?
No. Car oil lacks the anti-slip additives and O-ring-safe formulation required for motorcycle chain maintenance. Using automotive oil damages O-ring seals and voids manufacturer warranties. Always use O-ring-safe motorcycle chain lubricant for proper motorcycle chain maintenance.
What’s the difference between O-ring and X-ring chains for motorcycle chain maintenance?
X-ring chains (also called Z-ring) have seals shaped like an “X” instead of circular O-rings. X-ring chains reduce friction by 15–20%, improving fuel economy and performance. However, motorcycle chain maintenance procedures are identical for both types—the same O-ring-safe lubricants and cleaning methods work perfectly.
How do I know if my motorcycle chain is stretched beyond safe limits during maintenance inspections?
Measure 15 chain links (pin center to pin center) with a ruler. New chains measure exactly 20 inches. If your measurement exceeds 20.3 inches, the chain has stretched 0.3 inches and needs monitoring. Beyond 20.6 inches (0.6-inch stretch), replacement during motorcycle chain maintenance is overdue. Stretched chains won’t engage properly with sprockets, leading to slipping and accelerated wear.
Is it safe to ride with a slightly stiff chain link during motorcycle chain maintenance cycles?
One or two stiff links are manageable temporarily, but more than three stiff links affect power delivery and handling. Stiff links indicate damaged O-rings or bent pins—they can fail without warning. Continue careful motorcycle chain maintenance and schedule chain replacement soon. Riding with multiple stiff links risks chain failure at speed.
What’s the best lubricant for motorcycle chain maintenance in different weather?
For wet weather and rain: Use wax-based or thicker chain lubricants that resist water washoff. Reapply motorcycle chain maintenance lubrication more frequently (every 200–300 miles).
For dry, dusty conditions: Use lighter aerosol sprays that attract less dirt during motorcycle chain maintenance. Standard O-ring-safe lubricants work fine.
For winter storage: Apply a light coat of maintenance lubricant before storing your motorcycle. This prevents rust during off-season motorcycle chain maintenance.
Key Takeaways: Mastering Motorcycle Chain Maintenance
Motorcycle chain maintenance is simple, affordable, and critical to your bike’s safety and performance. By spending 15–30 minutes per month on proper motorcycle chain maintenance, you’ll:
- Extend chain life from 20,000 to 40,000+ miles
- Avoid costly sprocket replacement ($200–$300)
- Improve acceleration feel and responsiveness
- Ensure safe, reliable riding
The motorcycle chain maintenance process never changes: inspect for wear, clean gently, lubricate with O-ring-safe products, adjust tension, and replace when needed. Consistency matters more than perfection—monthly motorcycle chain maintenance keeps your chain and sprockets in top condition.
Ready to master other maintenance tasks? Check out our complete maintenance checklist to stay organized, and download our brake pad replacement guide to learn another essential DIY skill.


